Best Way To Tile Around A Bath / Image result for wall tiling around door jamb in shower | Bathroom shower tile, Bathrooms remodel - When sealing around a bath, half fill the tub with water before you start.
Best Way To Tile Around A Bath / Image result for wall tiling around door jamb in shower | Bathroom shower tile, Bathrooms remodel - When sealing around a bath, half fill the tub with water before you start.. Periodically check the tile line with a level to be sure they are straight. For wet areas like a shower floor, underwater, or a steam room, the solution is to instead use thinset and comes in a bag of dry powder you mix yourself. Every window or door has its own challenge, and the best way of waterproofing the assembly may be a challenge. Apply the silicone and leave overnight to cure, then empty the bath the next morning. Above the lip of the tub.
Bathroom tiles are a simple way to create character in a practical way. Once you are ready to lay the tile, start at the corner, with the chair rail border (image 2). This is placed upon the bath and the other leaf is tiled over using the first course of tiles. This will stop the silicone from splitting in the future; Then, in a vertical motion, use the notched edge of the trowel to create tidy rows of ridges in the adhesive.
+31 New Questions About Tile Shower Ideas with Tub Diy Answered and Why You Must Read ... from i.pinimg.com For exposed edges, set edge trim or bullnose tile pieces in place. Then, in a vertical motion, use the notched edge of the trowel to create tidy rows of ridges in the adhesive. This sits on top of your tiles and overlaps your gap. For wet areas like a shower floor, underwater, or a steam room, the solution is to instead use thinset and comes in a bag of dry powder you mix yourself. You can use a plastic tile bath trim which is self adhesive,l shaped with a rubber edge. Apply it to the wall with the bottom edge about 1/4 in. Caulking around your tub is a relatively simple process, but after the job is done, a full bathtub will tend to pull away from the wall or tiles due to the added weight. Cut as needed with tile snips or a wet saw to allow tile pieces a better fit around shower faucets and shower heads.
Start a new row above the first row and continue setting tile as instructed.
This sits on top of your tiles and overlaps your gap. When you tile around it get some of that bath and tile surround from the diy mercants. This surround contains a recessed alcove backed with mosaic tile, used to hold soaps and other bath materials. Bathroom tiles are a simple way to create character in a practical way. This video will show you how to set tile around a tub. I cover some of the specifics of how to layout and set up a tub to install tile around it.i'm using th. The classic design feature is usually between 34 and 54 high, with 36 being the average height. For a tub surround only, install the backerboard and tile 12 inches above the tub. If the tub is level, start with a full tile at its rim. Make sure your shower or bath's waterproofing system is designed with the windows in mind. Our expert, craig phillips, started his working life as an apprentice bricklayer, and. Periodically check the tile line with a level to be sure they are straight. Fit the bath then tile around it.
Make sure your shower or bath's waterproofing system is designed with the windows in mind. When tiling around a tub, mark the first layout line at the vertical edge of the tile next to the tub. Then, in a vertical motion, use the notched edge of the trowel to create tidy rows of ridges in the adhesive. When sealing around a bath, half fill the tub with water before you start. Apply the silicone and leave overnight to cure, then empty the bath the next morning.
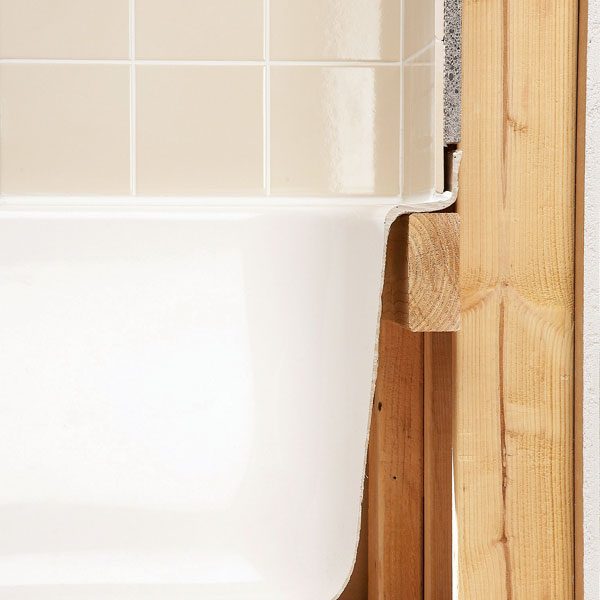
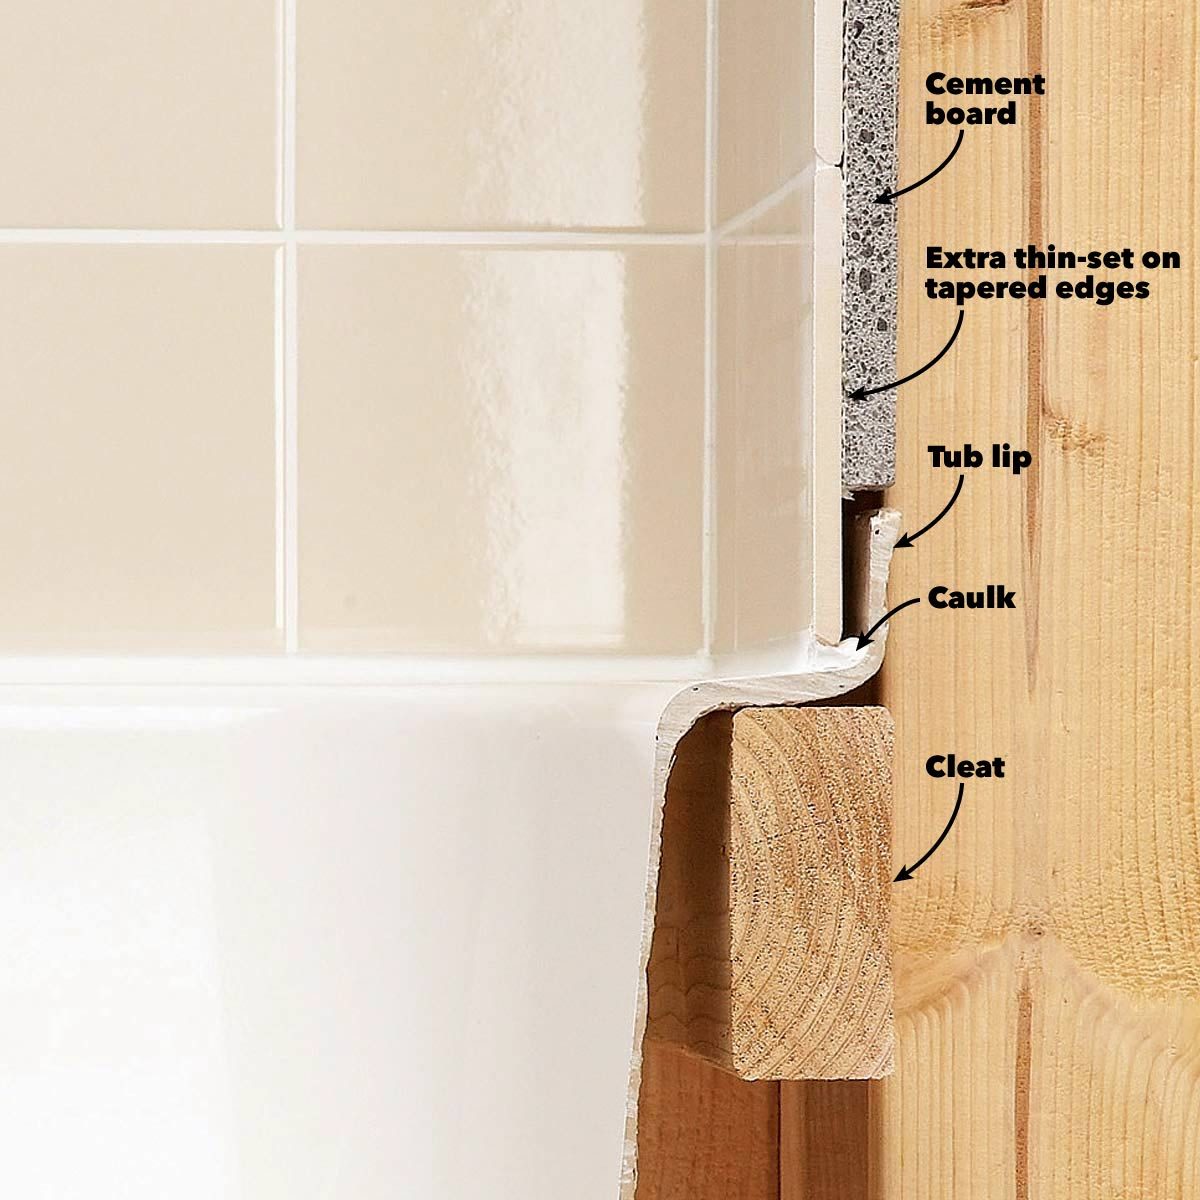
Tile Installation: Backer Board Around a Bathtub | The Family Handyman from cdn2.tmbi.com Divide the dimension in half and make a mark there. Once you are ready to lay the tile, start at the corner, with the chair rail border (image 2). Then, in a vertical motion, use the notched edge of the trowel to create tidy rows of ridges in the adhesive. Add a healthy dollop of the mixture to your trowel and whack it onto a small area you wish to tile. Make sure your shower or bath's waterproofing system is designed with the windows in mind. Just know that diagonal tile patterns require more planning, precise measuring, and cutting—especially around the perimeter of the room. Good advice but there is a sealing strip you can buy to fit to the wall before you finish off around the bath, the same procedure with water in the bath and fit the seal in the adhesive of the row next to the bath for a water tight seal. Apply the silicone and leave overnight to cure, then empty the bath the next morning.
Add a healthy dollop of the mixture to your trowel and whack it onto a small area you wish to tile.
Just know that diagonal tile patterns require more planning, precise measuring, and cutting—especially around the perimeter of the room. For wet areas like a shower floor, underwater, or a steam room, the solution is to instead use thinset and comes in a bag of dry powder you mix yourself. For a tub surround only, install the backerboard and tile 12 inches above the tub. Wainscotting is a classic choice for bathrooms that border on the traditional side. Once you are ready to lay the tile, start at the corner, with the chair rail border (image 2). Fit the bath then tile around it. I cover some of the specifics of how to layout and set up a tub to install tile around it.i'm using th. Good advice but there is a sealing strip you can buy to fit to the wall before you finish off around the bath, the same procedure with water in the bath and fit the seal in the adhesive of the row next to the bath for a water tight seal. Next, measure the width of the back wall, bisect the width and draw a vertical line down the wall behind the bath. Check if you need to adjust this mark to avoid laying slivers of tile at the top and bottom. The classic design feature is usually between 34 and 54 high, with 36 being the average height. This surround contains a recessed alcove backed with mosaic tile, used to hold soaps and other bath materials. When autocomplete results are available use up and down arrows to review and enter to select.
Cut as needed with tile snips or a wet saw to allow tile pieces a better fit around shower faucets and shower heads. If you will need a small slip of tile then you may prefer to have a part tile near the bath lip or at the top of your tiled area. Start a new row above the first row and continue setting tile as instructed. Adjust the vertical layout accordingly. Lee wallender when tiling bathtubs, backsplashes, and other areas that use limited quantities of tile, buy the best quality tile you can afford.
Tile Installation: Backer Board Around a Bathtub | The Family Handyman from www.familyhandyman.com When tiling around a tub, mark the first layout line at the vertical edge of the tile next to the tub. Then, in a vertical motion, use the notched edge of the trowel to create tidy rows of ridges in the adhesive. Don't tile around the toilet flange—the circular piece that connects to the drain pipe and upon which the toilet itself will rest—until the end. Above the lip of the tub. Once you are ready to lay the tile, start at the corner, with the chair rail border (image 2). Touch device users, explore by touch or with swipe gestures. Apply the silicone and leave overnight to cure, then empty the bath the next morning. Start by removing a few tiles to see how difficult the project will be.
Apparently replacing the sealant on the bathroom tub or shower tray is the most loathed diy by homeowners according to research by led hut.
Plan the tile layout so a column of tile extends past the end of the tub. This sits on top of your tiles and overlaps your gap. Heather from the heathered nest here at remodelaholic again today, and i want to show you all you remodelaholics how you can do this project, too. Wainscotting is a classic choice for bathrooms that border on the traditional side. This video will show you how to set tile around a tub. Tile layout around doors and windows is critical. Apply it to the wall with the bottom edge about 1/4 in. Just know that diagonal tile patterns require more planning, precise measuring, and cutting—especially around the perimeter of the room. This will stop the silicone from splitting in the future; Lee wallender when tiling bathtubs, backsplashes, and other areas that use limited quantities of tile, buy the best quality tile you can afford. Here's a few more tips on how to remove tile from a wall or floor: If the tub is level, start with a full tile at its rim. Every window or door has its own challenge, and the best way of waterproofing the assembly may be a challenge.